Adjusting an ergonomic chair is not a matter of fiddling with every knob until something feels tolerable. The adjustments build on one another, and the order matters: seat height first, then seat depth, then backrest and lumbar support, then armrests. I'll walk you through that sequence, with a physical cue at each step so you can confirm the setting fits your body rather than guessing.
Why Proper Chair Adjustment Matters for Your Health
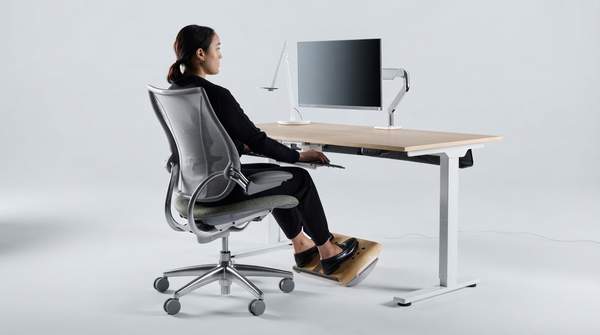
Here's the uncomfortable truth: owning an adjustable chair is not the same as sitting ergonomically. To achieve an ergonomic setup, begin by adjusting the seat height, then proceed to seat depth, backrest, lumbar support, and armrests, ensuring your feet are flat on the floor, your knees are bent at approximately 90 degrees, and your lower back is supported. The chair supports good posture, but it cannot create it for you. Even a perfect setup fails if you never move, so skip the crossed legs, keep your back straight and get up about once an hour.
The Canadian Centre for Occupational Health and Safety (CCOHS), which publishes workplace ergonomics guidance, adds a reassuring note: once your chair is properly adjusted for your height, the chair and its adjustment remain constant for the majority of setups in a typical office environment, even though different tasks require different accessories and layouts.
Step 1: Set Your Seat Height for Grounded Support
Start with height because everything else—your knee angle, your elbow height, your relationship to the desk—depends on it. Use the chair's height adjustment lever, typically under the seat, to raise or lower the chair until your feet rest flat on the floor and your knees sit at roughly a 90-degree angle, or slightly below hip level. Wirecutter's guide, written by Thorin Klosowski, offers a useful diagnostic: if you feel pressure at the front of your legs, the chair is too high—lower it. Ideally your elbows end up bent 90 degrees or more toward the desk, with the keyboard below your wrists.
If you can't achieve that and your desk raises and lowers, lower the desk instead. If the desk is fixed and you must raise the chair, your feet may no longer reach the floor—that's your cue to add a footrest.
Step 2: Adjust Seat Depth for Leg Circulation
With your height locked in, slide the seat pan forward or backward. On chairs that allow it, this works much like a car seat, usually via a button underneath the seat or a knob on the side, and it changes where you sit relative to the backrest. The goal is to prevent the front edge of the seat from pressing into the backs of your knees, which can restrict circulation in your legs. The verification cue is simple: sit with your feet flat on the floor and check that the clearance between the seat's front edge and your calves fits a clenched fist—roughly a two- to four-finger width gap.
If the seat edge is digging into the back of your knees, slide the seat back a little. If you have too much room and your knees stick out, slide it forward.
Step 3: Position Backrest and Lumbar Support for Spinal Alignment
Now bring the backrest into play, because your seated depth determines where your lower back meets it. Position the backrest so the lumbar support fits snugly into the natural curve of your lower back, supporting the S-curve of your spine rather than letting you slump into a C-shape. If your chair has adjustable lumbar height and depth, use both controls to match the support to your specific back curve—this is the fine-tuning that separates a chair that merely looks ergonomic from one that actually holds your spine in a healthy position. Proper lumbar support helps maintain an ergonomically sound posture over long stretches. You can also tilt the seat itself forward or backward if you prefer, as CCOHS notes, though the core priority remains that snug fit in the lumbar region.
Step 4: Fine-Tune Armrests for Shoulder and Neck Relaxation
Armrests come last because their correct height depends on where your elbows naturally hang once your seat height and posture are set. Bend your elbows at about a right angle and adjust the armrest height until they barely touch the undersides of your elbows, with your shoulders relaxed. Wirecutter's framing is memorable here: if the armrests are too high, they force you to shrug; too low, and you slouch. CCOHS goes further with a firm rule—remove the armrests from the chair entirely if the correct level cannot be achieved, or if the armrests, even in their lowest adjustment, elevate your elbows even slightly. Armrests should never interfere with free movement within your workstation or prevent you from sitting close to the desk.
Your Ergonomic Chair Adjustment Checklist
Follow this sequence in real time, verifying each physical cue before moving to the next step. Each adjustment establishes the baseline the following one depends on.
| Step | Goal | How to Adjust | Physical Cue to Verify |
|---|---|---|---|
| 1. Seat Height | Feet flat on floor, knees at 90 degrees or slightly below hips | Use the height lever under the seat | Feet flat; no pressure at the front of your legs. If feet can't reach the floor, add a footrest |
| 2. Seat Depth | Prevent pressure on the backs of the thighs and maintain circulation | Slide the seat pan via a button underneath or a side knob | A clenched-fist (two- to four-finger) gap between the seat edge and your calves |
| 3. Backrest & Lumbar | Support the natural curve of the spine, especially the lower back | Position the backrest so lumbar support fits the curve; adjust lumbar height and depth if available | Snug fit against the lower back with no slumping |
| 4. Armrests | Support arms, relax shoulders and neck | Raise or lower until armrests barely touch the undersides of elbows | Elbows at 90 degrees, shoulders relaxed, no shrugging or slouching |
Done correctly, this sequence produces a specific, checkable end state: feet flat on the floor, knees at a 90-degree angle, proper space behind the knees, a supported lower back, and arms positioned to reduce shoulder and neck strain.
Troubleshooting Common Chair Adjustment Challenges
Not every workstation cooperates. If your desk is fixed and too high, raising the chair to reach the keyboard may lift your feet off the floor—the answer is a footrest, not compromised posture. If your armrests can't drop low enough or bump into the desk and stop you from sitting close, CCOHS's advice is to remove them rather than let them push your elbows up or block your movement. For different tasks—typing versus mousing, for instance—expect to shift your position and accessories, though the chair's core adjustment stays constant. And remember the boundary of this guide: it covers a typical, fully-featured office chair for general office work, not kneeling chairs or exercise balls, and it is no substitute for professional medical advice if you have chronic pain or a musculoskeletal condition.
Achieving Lasting Comfort and Support
The decision I'd leave you with is this: regularly review and fine-tune your chair adjustments to maintain optimal ergonomic posture, especially if your tasks or body position change. A chair set correctly in January may no longer fit after a desk move or a change in footwear habits. The measurable indicator of success is reduced discomfort, improved posture, and sustained productivity during extended work periods—along with the concrete cues you can recheck anytime: flat feet, 90-degree knees, a fist-width gap behind your knees, a supported lumbar curve, and relaxed shoulders. Re-verify those five cues, and get up about once an hour.
Sources
- Office Ergonomics - How to Adjust Office Chairs — CCOHS
- How to Adjust Your Office Chair — Wirecutter: Reviews for the Real World